Ever walk into your favorite coffee shop, take a deep breath of that incredible aroma, and think, “I wish I could do this at home”? That feeling of watching a skilled barista pull a perfect, syrupy espresso shot is a kind of magic. Well, what if I told you that magic is within your reach? Learning How To Brew Barista Style Coffee At Home isn’t about buying the most expensive gear or having some innate talent. It’s about understanding a few key principles and, most importantly, enjoying the process.
I’m your guide here at Coffee Maker Best, and I’ve spent more years than I can count behind espresso machines, both professionally and in my own kitchen. Trust me, I’ve made every mistake in the book so you don’t have to. Together, we’re going to demystify the art of the perfect brew and turn your kitchen counter into your new favorite coffee spot. Let’s get started.
What Really Makes Coffee “Barista Style”?
First things first, what are we even talking about? “Barista style” coffee isn’t just a fancy term. It refers to a coffee, typically espresso-based, that’s prepared with precision, care, and a deep understanding of the variables at play. It’s about achieving balance—a harmony of sweetness, acidity, and bitterness—and a rich, satisfying texture.
It boils down to controlling four key elements, which the Italians, the godfathers of espresso, call the “4 Ms”:
- Miscela (The Coffee Blend): It all starts with the beans. You can’t make a masterpiece with cheap paint, and you can’t make great coffee with stale, low-quality beans.
- Macinadose (The Grinder & Dose): How finely you grind the coffee and how much you use is absolutely critical. This is arguably more important than the espresso machine itself.
- Macchina (The Espresso Machine): This is the tool that uses high pressure and hot water to work its magic.
- Mano (The Hand of the Barista): This is you! Your technique, your practice, and your passion bring it all together.
Getting these four elements to work in concert is the true secret behind learning how to brew barista style coffee at home.
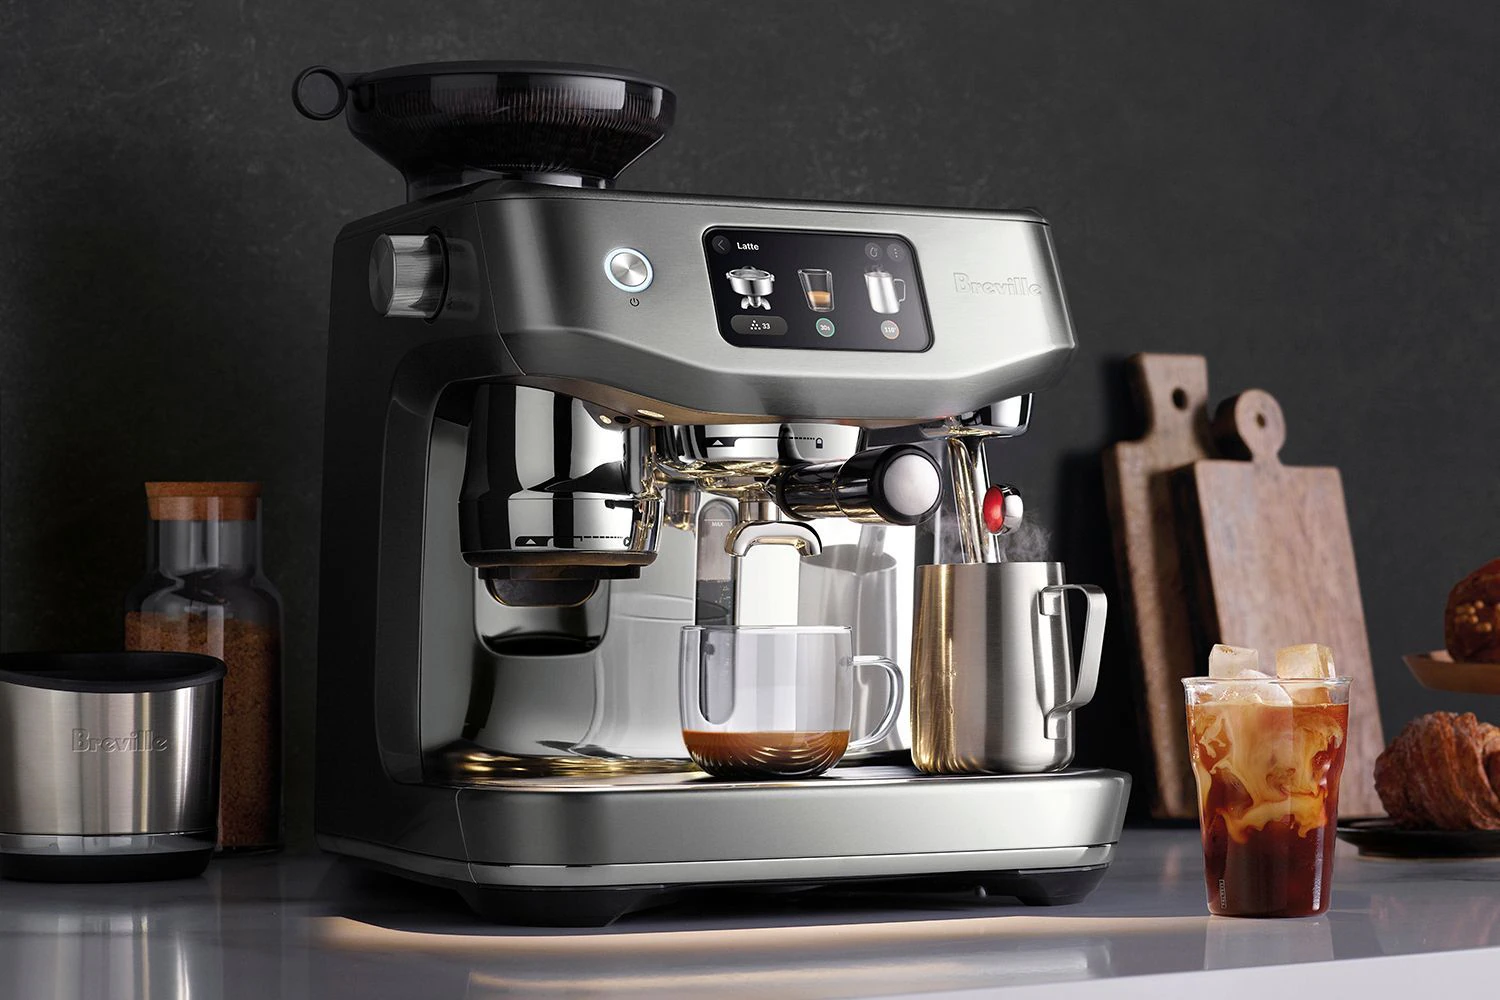
Choosing Your Weapon: The Right Machine for the Job
While a French press or a drip coffee maker can make a fantastic cup of coffee, they can’t produce true espresso. To get that concentrated, crema-topped shot, you need a machine that can generate high pressure (ideally 9 bars).
The Home Espresso Machine: Your Gateway to Greatness
This is the heart of your home cafe setup. They range from beginner-friendly automatic machines to more hands-on semi-automatic models that give you full control.
- Semi-Automatic Machines: These are the most popular for home enthusiasts. You control the grind, dose, and tamp, but the machine controls the pressure and temperature. This is the perfect balance of control and convenience.
- Super-Automatic Machines: These are the “bean-to-cup” models. You press a button, and the machine grinds the beans, tamps the coffee, and pulls the shot for you. They’re incredibly convenient but offer less room for a budding barista to experiment and hone their craft.
- Manual (Lever) Machines: For the purists. These require you to physically pull a lever to generate the pressure. They are beautiful, rewarding, and have a steep learning curve.
“Your first espresso machine doesn’t need to cost a fortune. What’s more important is that it can produce consistent temperature and pressure. A reliable entry-level machine paired with a great grinder will always outperform a high-end machine with a poor grinder.” – Isabella Rossi, veteran barista and coffee consultant.
Don’t Forget the Grinder!
I’m going to say this in bold because it’s that important: Your grinder is more important than your espresso machine. A good burr grinder gives you a consistent grind size, which is essential for a balanced extraction. Using pre-ground coffee for espresso is like trying to run a marathon in flip-flops—you just won’t get the results you want. The moment coffee is ground, it starts losing its aromatic compounds. Fresh is always best.
|
Our Picks for the Best Coffee Maker in 2026
As an Amazon Associate, we earn from qualifying purchases.
|
||
| Num | Product | Action |
|---|---|---|
| 1 | Keurig K-Duo Hot & Iced Single Serve & Carafe Coffee Maker, MultiStream Technology, 72oz Reservoir (Gen 2) |

|
| 2 | Mr. Coffee Black Coffee Maker, 12 Cups, with Auto Pause and Glass Carafe, Perfect for Home and Office Use |
|
| 3 | Nespresso Vertuo Pop+ Coffee and Espresso Maker by De\'Longhi, Samra Origins by The Weeknd Vertuo Buna Yellow Aeroccino3 milk frother |
|
| 4 | Amazon Basics Coffee Makers, 12-Cup Coffee Machines with Reusable Filter, Coffee Pots, Black & Stainless Steel |
|
| 5 | BLACK+DECKER 12-Cup Coffee Maker with Easy On/Off Switch, Easy Pour, Non-Drip Carafe with Removable Filter Basket, Vortex Technology, Black |
|
| 6 | BLACK+DECKER 12-Cup Digital Coffee Maker, Programmable, Washable Basket Filter, Sneak-A-Cup, Auto Brew, Water Window, Keep Hot Plate, Black |
|
| 7 | BLACK+DECKER 12-Cup Coffee Maker with Easy On/Off Switch, Easy Pour, Non-Drip Carafe with Removable Filter Basket, Vortex Technology, Black |
|
| 8 | BLACK+DECKER 12-Cup Digital Coffee Maker, Programmable, Washable Basket Filter, Sneak-A-Cup, Auto Brew, Water Window, Keep Hot Plate, Black |
|
| 9 | Keurig K-Express Single Serve K-Cup Pod Coffee Maker, 3 Brew Sizes, Strong Button Feature, 42oz Removable Reservoir, Black |
|
| 10 | Mini Hot and Iced Coffee Maker Single Serve, for K Cup and Ground, 6 to 14 Oz Brew Sizes, with Recipe Book, for Home, Travel, RV, Office and Dorm, Classic Black (2.0 Version) |
|
Your Step-by-Step Guide: How to Brew Barista Style Coffee at Home
Alright, you’ve got your beans, your grinder, and your machine. Let’s pull a shot of espresso. This process is a ritual. Take your time and enjoy it.
- Start with a Clean Slate: Make sure your machine’s portafilter (the handle with the little basket) is clean and dry. Any old coffee grounds will make your new shot taste bitter.
- Dose Your Coffee: Grind your fresh coffee beans directly into the portafilter. The amount you use is your “dose.” A typical double shot uses around 18-20 grams of coffee. A small kitchen scale is your best friend here.
- Distribute and Tamp: Gently level the grounds in the portafilter. Then, using a “tamper,” press down firmly and evenly. You’re aiming for about 30 pounds of pressure. Think of it like pressing a firm doorbell. The goal is to create a compact, level “puck” of coffee so water flows through it evenly.
- Lock and Brew: Lock the portafilter into the machine and immediately start the brew. Don’t let it sit, as the heat from the machine can start to burn the surface of the coffee.
- Watch the Magic Happen: You’re aiming for a “brewing ratio” of about 1:2. This means for 18 grams of coffee grounds, you want to get about 36 grams of liquid espresso in your cup. This should take between 25-30 seconds. The espresso should look like warm honey flowing from the spouts. That beautiful reddish-brown foam on top? That’s the crema, and it’s a sign of a well-pulled shot.
Is it running too fast (under 20 seconds)? Your grind is too coarse.
Is it choking the machine or dripping too slowly (over 35 seconds)? Your grind is too fine.
This dance between grind size, dose, and time is the core skill of a home barista.
How Do I Steam Milk Like a Pro?
A perfect espresso shot is only half the story for drinks like lattes and cappuccinos. The other half is beautifully textured, silky smooth steamed milk. We’re not looking for the big, bubbly foam you get from a cheap frother. We’re aiming for microfoam.
Think of microfoam as milk with millions of tiny, imperceptible bubbles. It has the texture of wet paint or melted ice cream, a natural sweetness, and is essential for latte art.
The Two-Step Process for Silky Milk
- Stretching (Adding Air): Fill your milk pitcher about halfway with cold milk. Place the tip of the steam wand just below the surface of the milk. Turn the steam on. You should hear a gentle “tsss-tsss” sound, like paper tearing. This is the sound of air being introduced. Keep the tip near the surface until the pitcher feels lukewarm to the touch.
- Texturing (Creating the Whirlpool): Once the milk is lukewarm, submerge the steam wand deeper into the pitcher, angling it to create a whirlpool. This vortex breaks down the larger bubbles and folds the air in, creating that silky microfoam. Keep this going until the pitcher is hot to the touch (but not so hot you can’t hold it for a second—about 140-150°F or 60-65°C).
Immediately turn off the steam, wipe the wand, and give the pitcher a firm tap on the counter to pop any remaining large bubbles. Swirl the milk to keep it glossy. Now, you’re ready to pour.
From Shot to Sip: Building Your Favorite Drinks
Now for the fun part!
- Americano: A shot of espresso topped with hot water. A great way to appreciate the flavor of the coffee in a longer drink.
- Latte: A shot of espresso with steamed milk, topped with a small layer of foam. The milkiest and smoothest of the classic drinks.
- Cappuccino: Traditionally, a drink of thirds: 1/3 espresso, 1/3 steamed milk, and 1/3 foam. It’s lighter and more foam-forward than a latte.
- Flat White: Hailing from Australia/New Zealand, it’s similar to a latte but with a thinner layer of microfoam and a more intense coffee flavor.
Final Tips for Your Home Barista Journey
- Use Good Water: Your coffee is 98% water. If your tap water tastes bad, so will your coffee. Use filtered water for the best results.
- Keep It Clean: Clean your machine regularly. Old coffee oils build up and will quickly turn your delicious coffee into a bitter mess.
- Practice Makes Perfect: Your first few shots might not be perfect, and that’s okay! Every bag of beans is different. Embrace the learning process. Learning how to brew barista style coffee at home is a journey, not a destination.
Frequently Asked Questions (FAQ)
Q: Do I really need an expensive espresso machine?
A: Absolutely not. A reliable, entry-level machine that can maintain stable temperature and pressure is all you need to start. Spend your money on a quality burr grinder first; it will have a much bigger impact on your coffee’s taste.
Q: Can I use pre-ground coffee to brew barista style coffee at home?
A: While you technically can, you will be disappointed with the results. Espresso brewing is very sensitive to grind size, and pre-ground coffee is rarely the right fineness. More importantly, it loses its freshness and flavor almost immediately after grinding.
Q: What is the single most important thing for better tasting coffee?
A: Freshly roasted, high-quality coffee beans. Start with a great core ingredient. Look for roasters that print the “roasted on” date on the bag, and try to use the beans within a month of that date for optimal flavor.
Q: My espresso shots are always bitter or sour. What am I doing wrong?
A: This is all about extraction. As a general rule, a sour shot is “under-extracted” (water ran through too fast), so you need to grind your coffee finer. A bitter shot is “over-extracted” (water ran through too slowly), so you need to grind coarser.
Q: What’s the difference between a latte and a cappuccino?
A: It’s all about the milk-to-foam ratio. A traditional cappuccino has a thick, airy cap of foam on top. A latte has much more steamed milk and just a thin layer of foam, making it a creamier, smoother drink.
Your Home Cafe Awaits
Stepping into the world of home espresso can feel intimidating, but it’s one of the most rewarding hobbies you can pick up. It transforms your morning routine from a sleepy necessity into a mindful, creative ritual. By focusing on the fundamentals—great beans, a consistent grind, and solid technique—you have everything you need to know about how to brew barista style coffee at home.
So go ahead, experiment, make a few messes, and enjoy the incredible coffee that you created with your own two hands. Your journey to becoming a home barista starts now.